To get the greatest level of satisfaction out of brewing your own beer you may be very tempted to control almost every aspect of the process. One of the best ways that you can control the taste of your homebrew beer is with the help of quality hops. With many of the world’s best top righties quite expensive to purchase for use in homebrewing, you might want to consider growing your own.
Through the scarcity of hops which can be found throughout the world many home brewers are taking to actually growing their own ingredients and especially their own hops in the comfort of your own home.
Where to grow hops:
The good news is you can grow hops regardless of the area that you live in. Whether you are a resident of the North or South you can keep your own personal hop supply and even grow hops in a fairly moderate climate with a decent amount of care.
Many home brewers choose to grow their own hops in the basement or even in a small greenhouse but even in moderate climates you could potentially grow hops with the right garden conditions. Hops themselves can be grown directly from small root cuttings which are otherwise called as Rhizomes. You can often find these items online and these will be used for actually starting the hop variety you would like to grow. The good news is these are reusable so many other home brewers may be willing to give them away. You can also invest in several different types of hops knowing that you could easily continually grow the same hops year in and year out from the same hop Rhizomes.
Where to find Hop Rhizomes:

You can often find Hop Rhizomes in a variety of areas. Not only are these items available from many homebrewing supply companies but you can often find them in local classified ads from other home brewers. Meeting with local classified ad home brewers can be a fantastic way to find out which types of hops are easiest to grow in your local soil. Ordering online can also give you access to a huge marketplace of various top righties that you can try a new beer recipes.
Amazon is a great place where you can try to buy hop varieties online but Rhizomes often need to be purchased in the same country that you are going to be shipping them into. This is because it’s difficult to transport plant materials across borders. Ordering these items within the same country however from Amazon or eBay is extremely simple. Without any kind of border regulations you can quite easily get access to the plant materials that you need for actually starting to grow hops at home.
Picking the right location:
After you have acquired the Hop Rhizomes to get started you need to pick a good area of your back yard or optimal lighting conditions for growing these materials. Hops usually need around 6-8 hours of sun each day so it’s important to pick an area of your backyard that has a decent amount of sun. The vines for hops also take up a fair amount of space. Hop Vines which are also commonly called Bines can sometimes take over up to 25 feet of area and grow to be as heavy as 20 pounds.
Most hop growers would suggest placing hops in an area such as this outside of your home or on the south side of a structure with a trellis on the wall. Having a vertical area for the hops to continually grow towards the sun will help to improve their overall quality and ensure that you have plenty of hops to use for homebrewing projects. Keep the size open for a plant that could take up over 25 feet.
If you are planning on planting several different hopper righties it’s extremely important that you keep them nice and separated. Counting out at least 10 to 15 feet between the sites you plant your hops is essential to making sure that the roots will have plenty of space to grow. Hop roots can actually spread extremely quickly and take over your garden unless you are willing to trim out the roots between seasons. This will also work to prevent the hop varieties from killing one another off.
Preparing the soil is also extremely important for growing good hops. For starting your hops you should consider aerating the soil first and making sure that the area where you’re planting the vines has solid drainage with nutrient rich soil. Be sure to churn up the soil and check on the soil quality before picking the area you are going to plant the hop vines.
Planting:

Most recommend planting hops in late spring so that Frost can be avoided. Hops also need liberal fertilization. To get started simply aerate the ground ensuring it several times over as well as make sure that there is proper drainage for the roots.
Place the hop Rhizomes around 4 inches into the amount of soil and keep the mound of soil around 1 foot high to add extra drainage. Plant the hop Rhizome with the root side down and cover the top of the mound with a light mulch or straw to try and inhibit weeds from growing and ruining the growth of the hop bine.
The hop bine will start to grow quite quickly upwards and does require a trellis. Regularly adjust the hop bines and make sure that they are crawling up the trellis well. Regular water and sunlight especially in dry climates are required. You may even need to water hops daily to make sure that the bines will continue growing in a clockwise direction around the trellis. Sometimes this can involve cutting off some of the smaller shoots which are going in the opposite direction.
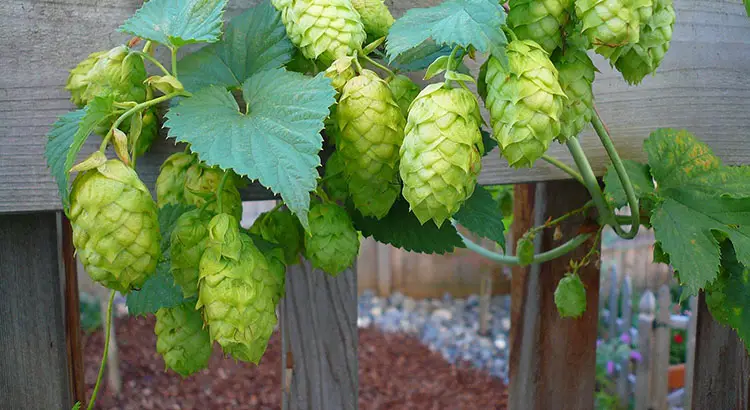
Harvest:

Most would recommend harvesting hops in the late summer. You may not get a giant amount of hops in the very first year and they may not right then all at once. Harvest each of the hops as they are ready. Hop cones which are ready to be picked have a dry touch, a springy nature as well as a very strong odor. They can often leave a yellow powder called lupulin if you touch them lightly with your finger, If the cones are giving off plenty of this gold to yellow powder, this is a great sign of ripening.
Hops need to be kept away from sunlight when they are completed. Pick a spot in your house that’s dry and warm and consider storing them in a paper bag as they dry out. Sometimes it can take one week to two weeks to fully dry your hops out. When they have fully dried out seal them up in a bag and keep them in your freezer with as little oxygen in the bag is possible for your homebrewing projects.
Aftercare:
Cut down the bines to 3 feet to care for the hops in the winter. Without cutting them back winter frost can kill off the bines for good. To reactivate the rhizome in the spring, cut and trim back the roots to about 1 foot so that the hops don’t take over too large a space. Hops that are left can sometimes spread across the entire garden like a weed so this regular yearly cut back is required.